The culinary world is replete with dishes that promise elegance and flavor, but few deliver with the speed and satisfying tenderness of a perfectly executed chicken scallopini. This classic Italian-American dish, featuring thinly pounded chicken breasts lightly breaded and pan-fried, is a staple in kitchens worldwide for its quick preparation and versatility. Yet, for many home cooks, the quest for truly tender chicken scallopini can often end in disappointment, yielding dry, tough, or unevenly cooked results.
If you've ever wondered how restaurants achieve that melt-in-your-mouth tenderness every time, you're in the right place. Unlocking the secrets to succulent chicken scallopini isn't about magical ingredients or complex techniques; it's about understanding and respecting a few fundamental principles. From choosing the right cut to mastering the pan, we'll guide you through the critical steps that guarantee a consistently delicious and tender experience. Prepare to transform your approach to this beloved dish and discover Why Chicken Scallopini is Your Next Favorite Meal.
The Foundation of Flavor: Choosing and Preparing Your Chicken
Achieving truly tender chicken scallopini begins long before the pan even hits the heat. The quality and initial preparation of your chicken are absolutely paramount, setting the stage for all subsequent steps.
Selecting the Perfect Cut for Scallopini
- Breast Meat is Best: While variations exist, boneless, skinless chicken breasts are the traditional and ideal choice for scallopini. Their lean nature and consistent texture make them perfectly suited for being pounded thin and cooked quickly. Look for fresh, plump breasts without any bruising or signs of freezer burn.
- Quality Matters: Opt for high-quality chicken from a reputable source whenever possible. Better quality chicken often has superior texture and flavor, which will shine through in your finished dish. Organic or free-range options can sometimes offer a more robust flavor profile.
The Art of Pounding: Why Thickness is Key
Pounding the chicken is arguably the single most critical step for achieving both tenderness and even cooking in chicken scallopini. It's not just about making the chicken thinner; it's about tenderizing it and creating uniformity.
- Achieving Even Thickness: The goal is a uniform thickness, typically about ¼ to ⅓ inch. This consistency is vital because it ensures every part of the chicken cooks at the same rate, preventing thinner edges from drying out while thicker sections are still undercooked. Unevenly pounded chicken is a common culprit for dry spots.
- How to Pound Effectively:
- Place a single chicken breast between two sheets of plastic wrap or inside a large, sturdy zip-top bag. This keeps your workspace clean and prevents tearing the delicate meat.
- Using the flat side of a meat mallet, a heavy-bottomed skillet, or even a rolling pin, gently and evenly pound the chicken. Start from the center and work your way outwards, applying consistent pressure.
- Be firm but controlled. The aim is to flatten and spread the meat, not to tear it. If the chicken starts to tear, ease up on the pressure.
- The Tenderizing Effect: Pounding does more than just flatten. The physical force helps to break down and relax the tough muscle fibers in the chicken. This natural tenderizing process makes the cooked chicken significantly more tender and allows it to absorb seasonings and the pan sauce more effectively. It also dramatically reduces cooking time, which further contributes to tenderness by minimizing the chance of overcooking.
The Golden Crust: Dredging and Pan-Frying Perfection
Once your chicken is perfectly prepped and tenderized, the next stage involves creating that irresistible golden crust and cooking it to sublime tenderness. This is where many home cooks either succeed or stumble with their chicken scallopini, as precision and timing are key.
Seasoning and Dredging: A Delicate Balance
- Season Liberally: Before dredging, generously season both sides of your pounded chicken with salt and freshly ground black pepper. This is your primary chance to infuse flavor directly into the meat. Don't be shy; a thin piece of chicken needs ample seasoning to taste its best.
- The Flour Coat: Lightly dredge each piece of chicken in all-purpose flour. The key word here is "lightly." After coating, shake off any excess flour thoroughly. A thin, even coating is what you're after, not a thick, pasty batter.
- Why Flour? The flour serves multiple critical purposes. It creates a protective barrier that helps prevent the chicken from drying out, contributes to that beautiful golden-brown crust, aids in searing, and most importantly, it thickens your pan sauce later, creating a cohesive, delicious final dish. Too much flour, however, can lead to a gummy texture and inhibit proper browning.
Mastering the Pan-Fry: Speed and Sizzle
This is where the magic happens, but also where overcooking often occurs. Precision in heat, fat, and timing is paramount for tender chicken scallopini.
- Choose the Right Pan: A heavy-bottomed skillet (such as cast iron, stainless steel, or a good quality non-stick) is ideal. These pans retain and distribute heat evenly, which is crucial for consistent cooking and browning.
- Heat and Fat: Heat a tablespoon or two of a high-smoke-point oil (like olive oil, grapeseed oil, or canola oil) or clarified butter over medium-high heat until it shimmers. A common chef's trick is to use a mix of oil and butter; the oil prevents the butter from burning too quickly, while the butter adds a rich, nutty flavor and promotes excellent browning.
- Don't Overcrowd the Pan: This is a crucial mistake to avoid. Cook the chicken in batches if necessary, ensuring each piece has ample space in the skillet. Overcrowding significantly lowers the pan's temperature, leading to steaming instead of searing. This results in pale, flabby, and ultimately less tender chicken, as it won't develop that desirable golden crust.
- Quick Cooking: Due to its thinness, chicken scallopini cooks incredibly fast. Sear for just 2-3 minutes per side, or until golden brown, cooked through, and reaches an internal temperature of 165°F (74°C). Use a meat thermometer if unsure. Overcooking is the arch-nemesis of tender chicken breasts; even an extra minute can turn succulent meat into dry, stringy protein.
- Resting (Briefly): While not as critical as with larger cuts of meat, letting the scallopini rest for a minute or two on a clean plate after cooking can help the juices redistribute, ensuring maximum moisture and tenderness.
Elevating the Experience: The Role of the Sauce
A tender piece of chicken scallopini is wonderful on its own, but it truly shines when bathed in a complementary pan sauce. The sauce not only adds incredible layers of flavor but also enhances the perceived moisture and tenderness of the dish, making each bite an unforgettable experience.
Building the Perfect Pan Sauce
The beauty of scallopini sauces lies in their simplicity and ability to transform leftover pan drippings into liquid gold.
- Deglazing: After removing the cooked chicken, you'll find flavorful browned bits (known as "fond") stuck to the bottom of your pan. This is pure culinary gold! Immediately deglaze the hot pan with a splash of liquid—white wine, chicken broth, or even fresh lemon juice. Use a wooden spoon to scrape up all those delicious, caramelized bits. This step is fundamental to building a deep, rich flavor foundation for your sauce.
- Common Sauce Bases:
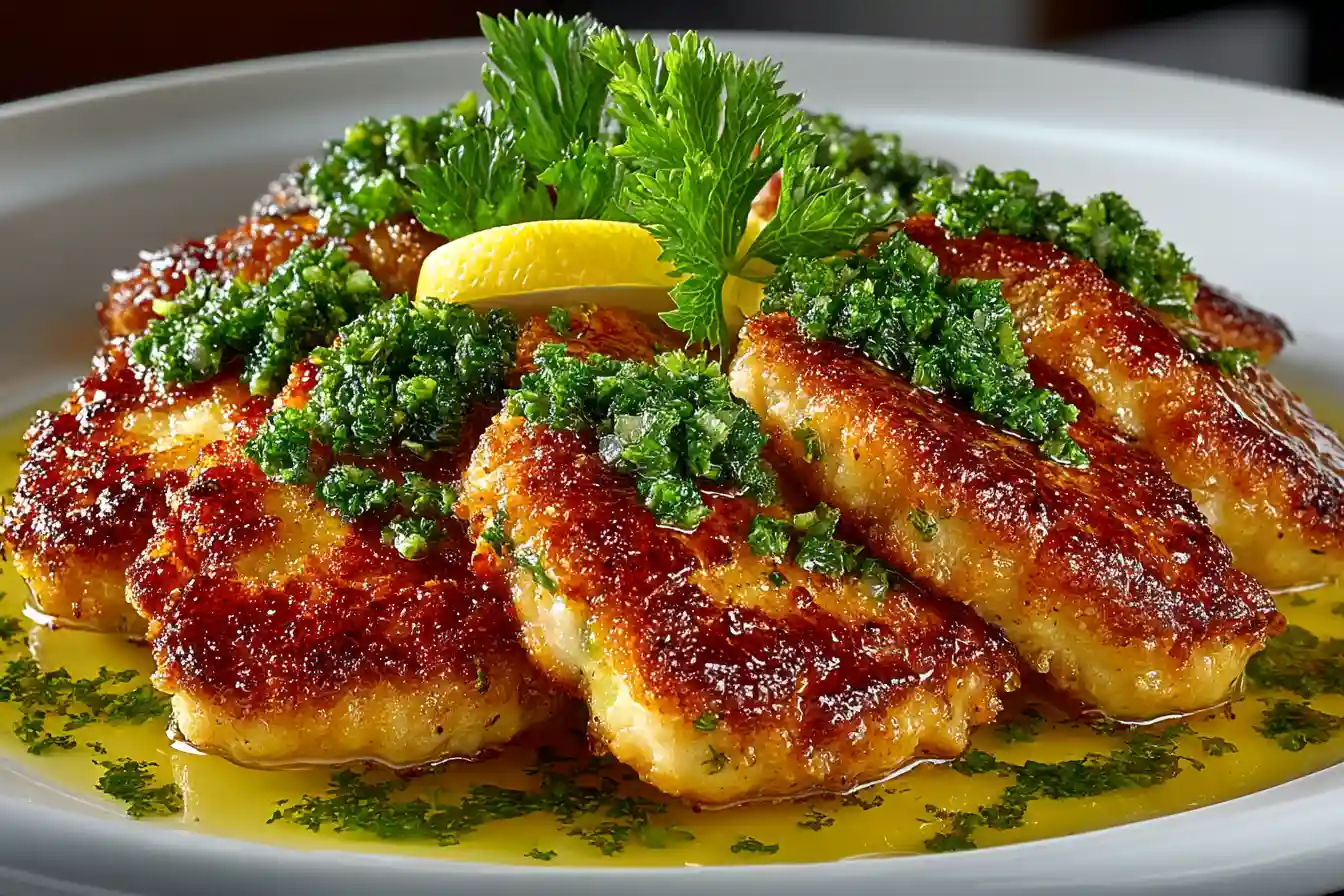
- Lemon Butter Sauce (Piccata Style): A timeless classic. After deglazing, whisk in more chicken broth, fresh lemon juice, and a knob or two of cold butter for richness and shine. Stir in capers for a traditional Piccata, or fresh parsley for a simpler, brighter flavor.
- Mushroom Sauce: Sauté sliced mushrooms in the pan drippings until golden, then deglaze. Add chicken broth, perhaps a touch of cream or Marsala wine for a richer, earthy sauce.
- Marsala Sauce: A sweet and savory option made with Marsala wine, chicken broth, and often mushrooms. It offers a unique depth of flavor that perfectly complements the delicate chicken.
- Simmer to Thicken: Allow your chosen sauce to simmer for a few minutes until it slightly thickens to a desired consistency. Taste and adjust seasonings (salt, pepper, a squeeze of lemon) as needed. You can return the cooked chicken to the sauce briefly to warm through and coat, or simply spoon the luscious sauce over the scallopini when serving.
For those looking for a step-by-step culinary journey with precise measurements and techniques, our comprehensive guide Perfect Chicken Scallopini: An Easy Recipe Guide offers detailed instructions to help you master this elegant dish with confidence.
Common Mistakes to Avoid for Succulent Scallopini
Even with the best intentions, certain missteps can turn your quest for tender chicken scallopini into a tough, dry disappointment. Awareness of these pitfalls is your first line of defense against culinary catastrophe.
- Overcooking: The Arch-Nemesis: This is, without a doubt, the biggest culprit for dry and tough chicken. Chicken breasts are inherently lean and prone to drying out quickly. Remember: thin cuts mean fast cooking. Always keep an eye on the clock and the appearance of the chicken, aiming for just golden brown and cooked through.
- Uneven Pounding: If your chicken isn't pounded to a uniform thickness, some parts will be thinner and cook faster, leading to dry, overcooked edges while thicker sections might still be undercooked. Precision here ensures consistent tenderness.
- Crowding the Pan: As highlighted earlier, cramming too many pieces of chicken into the skillet instantly drops the pan's temperature. This prevents searing and browning, leading to steaming instead. The chicken will then become tough and lack that desirable crispy exterior. Always cook in batches.
- Skimping on Fat: While we aim for a healthy meal, sufficient fat (oil, butter, or both) is crucial for proper searing, browning, and preventing sticking. Don't be afraid to add a little more if the pan looks dry between batches or if your chicken isn't browning properly.
- Not Seasoning Adequately: Bland chicken scallopini, even if perfectly tender, loses much of its appeal. Ensure you generously season the chicken with salt and pepper before dredging, as this is your main opportunity to flavor the meat itself.
Conclusion
Mastering truly tender chicken scallopini is not about complex techniques or obscure ingredients, but rather a diligent application of a few key principles: careful preparation, precise cooking, and a delightful accompanying sauce. From selecting the right chicken breast and pounding it to an even thickness, to achieving that perfect golden sear without ever overcooking, each step contributes profoundly to the succulent outcome. With these secrets in your culinary arsenal, you're well on your way to creating an elegant, undeniably delicious, and consistently tender meal that will impress every time.
Embrace the sizzle, savor the aroma, and enjoy the delicate tenderness of perfectly prepared chicken scallopini. It's a dish that proves simplicity, when executed with care, can yield the most extraordinary results. So go forth, pound with confidence, fry with focus, and revel in the joy of truly tender chicken scallopini.
